CI/CD Pipeline之Gitlab部署
一、CI/CD简介
GitLab是一个开源版本管理系统,是集代码托管,测试,部署于一体的开源git仓库管理软件,可通过web界面来进行访问公开的或私人项目。与Github类似,GitLab能够浏览代码,管理缺陷和注释。可以管理团队对仓库的访问,它非常易于浏览提交过的版本,并提供一个文件历史库。是目前非常流行好用的研发版本控制系统。
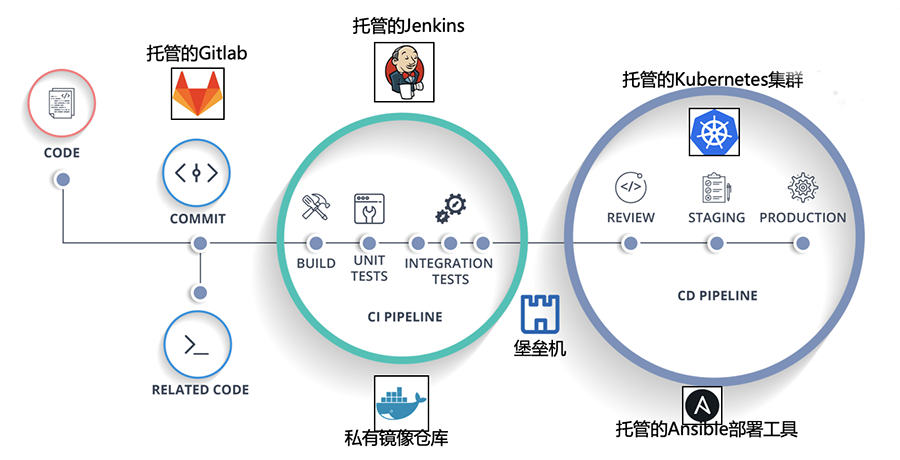
二、部署GitLab
2.1 部署环境介绍
CentOS 7.5
GitLab版本 11.5.3
清华镜像源:https://mirrors.tuna.tsinghua.edu.cn/gitlab-ce/yum/el7/
2.2 GitLab部署
(1)安装环境
[root@10-27-0-224 ~]# yum install curl policycoreutils openssh-server openssh-clients -y
[root@10-27-0-224 ~]# yum install postfix -y
[root@10-27-0-224 ~]# yum install policycoreutils-python -y
(2)修改配置
# 修改配置
[root@10-27-0-224 ~]# vim /etc/postfix/main.cf
inet_interfaces = all                          # 将localhost修改成all

[root@10-27-0-224 ~]# cat /etc/postfix/main.cf | grep -v '#' | grep -v '^$'
queue_directory = /var/spool/postfix
command_directory = /usr/sbin
daemon_directory = /usr/libexec/postfix
data_directory = /var/lib/postfix
mail_owner = postfix
inet_interfaces = all
inet_protocols = all
mydestination = $myhostname, localhost.$mydomain, localhost
unknown_local_recipient_reject_code = 550
alias_maps = hash:/etc/aliases
alias_database = hash:/etc/aliases
debug_peer_level = 2
debugger_command =
	 PATH=/bin:/usr/bin:/usr/local/bin:/usr/X11R6/bin
	 ddd $daemon_directory/$process_name $process_id & sleep 5
sendmail_path = /usr/sbin/sendmail.postfix
newaliases_path = /usr/bin/newaliases.postfix
mailq_path = /usr/bin/mailq.postfix
setgid_group = postdrop
html_directory = no
manpage_directory = /usr/share/man
sample_directory = /usr/share/doc/postfix-2.10.1/samples
readme_directory = /usr/share/doc/postfix-2.10.1/README_FILES

[root@10-27-0-224 ~]# systemctl start postfix.service
[root@10-27-0-224 ~]# systemctl status postfix.service
[root@10-27-0-224 ~]# systemctl enable postfix
(3)部署GitLab
# 部署方式一:RPM安装
[root@10-27-0-224 ~]# wget https://mirrors.tuna.tsinghua.edu.cn/gitlab-ce/yum/el7/gitlab-ce-11.5.3-ce.0.el7.x86_64.rpm
[root@10-27-0-224 ~]# rpm -i gitlab-ce-11.5.3-ce.0.el7.x86_64.rpm
warning: gitlab-ce-11.5.3-ce.0.el7.x86_64.rpm: Header V4 RSA/SHA1 Signature, key ID f27eab47: NOKEY
It looks like GitLab has not been configured yet; skipping the upgrade script.

       *.                  *.
      ***                 ***
     *****               *****
    .******             *******
    ********            ********
   ,,,,,,,,,***********,,,,,,,,,
  ,,,,,,,,,,,*********,,,,,,,,,,,
  .,,,,,,,,,,,*******,,,,,,,,,,,,
      ,,,,,,,,,*****,,,,,,,,,.
         ,,,,,,,****,,,,,,
            .,,,***,,,,
                ,*,.


     _______ __  __          __
    / ____(_) /_/ /   ____ _/ /_
   / / __/ / __/ /   / __ `/ __ \
  / /_/ / / /_/ /___/ /_/ / /_/ /
  \____/_/\__/_____/\__,_/_.___/


Thank you for installing GitLab!
GitLab was unable to detect a valid hostname for your instance.
Please configure a URL for your GitLab instance by setting `external_url`
configuration in /etc/gitlab/gitlab.rb file.
Then, you can start your GitLab instance by running the following command:
  sudo gitlab-ctl reconfigure

For a comprehensive list of configuration options please see the Omnibus GitLab readme
https://gitlab.com/gitlab-org/omnibus-gitlab/blob/master/README.md

# 部署方式二:YUM安装
[root@10-27-0-224 ~]# curl -sS https://packages.gitlab.com/install/repositories/gitlab/gitlab-ce/script.rpm.sh | sudo bash
[root@10-27-0-224 ~]# yum install -y  gitlab-ce  git
[root@10-27-0-224 ~]# vim .bash_profile          # 修改环境变量
export LC_ALL="zh_CN.UTF-8"
export LC_CTYPE="zh_CN.UTF-8"
[root@10-27-0-224 ~]# source .bash_profile
2.3 GitLab设置邮箱通知
(1)安装postfix邮件代理服务
[root@10-27-0-224 ~]# yum install postfix -y
[root@10-27-0-224 ~]# vim /etc/postfix/main.cf
inet_interfaces = all
inet_protocols = ipv4

[root@10-27-0-224 ~]# systemctl enable postfix
[root@10-27-0-224 ~]# systemctl start postfix
(2)配置在Gitlab注册用户时的邮件发送确认动作

[root@10-27-0-224 ~]# vim /etc/gitlab/gitlab.rb
gitlab_rails['gitlab_email_from'] = '1938418737@qq.com'
gitlab_rails['smtp_enable'] = true
gitlab_rails['smtp_address'] = "smtp.qq.com"
gitlab_rails['smtp_port'] = 465
gitlab_rails['smtp_user_name'] = "1938418737@qq.com"
gitlab_rails['smtp_password'] = "xxxxxxxxx"
gitlab_rails['smtp_domain'] = "smtp.qq.com"
gitlab_rails['smtp_authentication'] = "login"
gitlab_rails['smtp_enable_starttls_auto'] = true
gitlab_rails['smtp_tls'] = true
alertmanager['admin_email'] = 'starcto@163.com'    # 告警管理员邮件
external_url 'http://gitlab.starcto.com'
(3)重新生成gitlab参数
[root@10-27-0-224 ~]# gitlab-ctl reconfigure     # 初始化配置
[root@10-27-0-224 ~]# gitlab-ctl restart         # 启动Gitlab,GitLab默认会占用80、8080和9090端口
ok: run: alertmanager: (pid 59245) 0s
ok: run: gitaly: (pid 59261) 1s
ok: run: gitlab-monitor: (pid 59272) 0s
ok: run: gitlab-workhorse: (pid 59286) 1s
ok: run: logrotate: (pid 59301) 0s
ok: run: nginx: (pid 59307) 1s
ok: run: node-exporter: (pid 59352) 0s
ok: run: postgres-exporter: (pid 59397) 0s
ok: run: postgresql: (pid 59407) 1s
ok: run: prometheus: (pid 59415) 0s
ok: run: redis: (pid 59425) 1s
ok: run: redis-exporter: (pid 59430) 0s
ok: run: sidekiq: (pid 59441) 0s
ok: run: unicorn: (pid 59453) 0s

[root@10-27-0-224 ~]# lsof -i:80
COMMAND   PID       USER   FD   TYPE DEVICE SIZE/OFF NODE NAME
nginx   59307       root    7u  IPv4 505800      0t0  TCP *:http (LISTEN)
nginx   59308 gitlab-www    7u  IPv4 505800      0t0  TCP *:http (LISTEN)
nginx   59309 gitlab-www    7u  IPv4 505800      0t0  TCP *:http (LISTEN)

[root@10-27-0-224 ~]# lsof -i:8080
COMMAND   PID USER   FD   TYPE DEVICE SIZE/OFF NODE NAME
bundle  59471  git   22u  IPv4 506827      0t0  TCP localhost:webcache (LISTEN)
bundle  59552  git   22u  IPv4 506827      0t0  TCP localhost:webcache (LISTEN)
bundle  59555  git   22u  IPv4 506827      0t0  TCP localhost:webcache (LISTEN)
bundle  59558  git   22u  IPv4 506827      0t0  TCP localhost:webcache (LISTEN)

[root@10-27-0-224 ~]# lsof -i:9090
COMMAND     PID              USER   FD   TYPE DEVICE SIZE/OFF NODE NAME
prometheu 59415 gitlab-prometheus    6u  IPv4 506906      0t0  TCP localhost:websm (LISTEN)
prometheu 59415 gitlab-prometheus    7u  IPv4 506911      0t0  TCP localhost:42142->localhost:websm (ESTABLISHED)
prometheu 59415 gitlab-prometheus    8u  IPv4 506293      0t0  TCP localhost:websm->localhost:42142 (ESTABLISHED)
prometheu 59415 gitlab-prometheus   11u  IPv4 506373      0t0  TCP localhost:42148->localhost:websm (ESTABLISHED)
prometheu 59415 gitlab-prometheus   12u  IPv4 506374      0t0  TCP localhost:websm->localhost:42148 (ESTABLISHED)
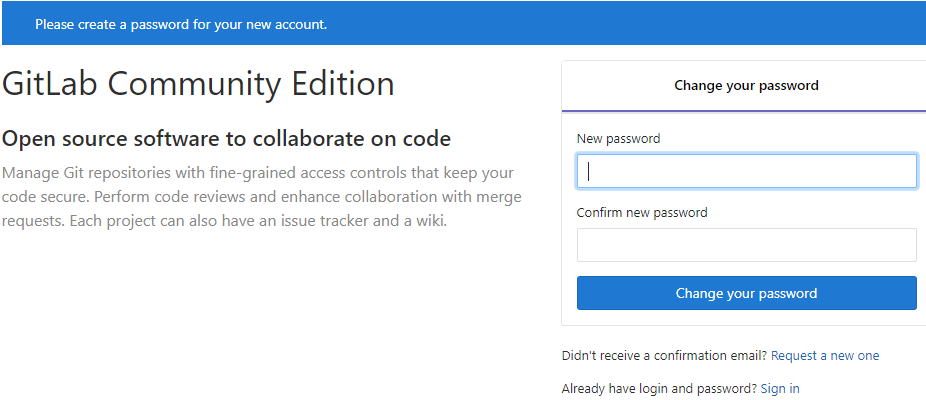
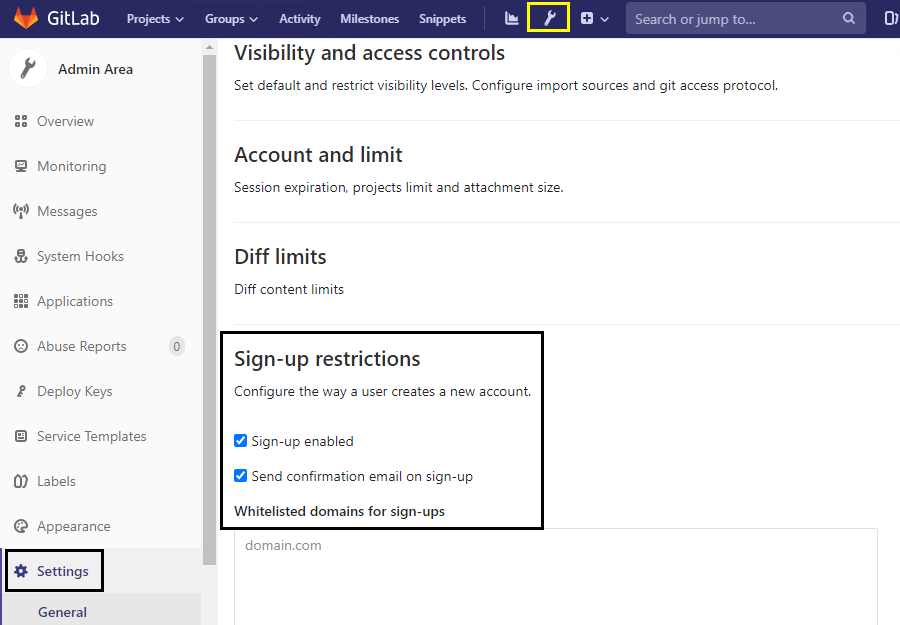
(4)设置注册GitLab用户时发送邮件确认
【注】首次访问时,会强制修改密码,默认管理员用户名是root。
2.4 GitLab汉化教程(默认已经可以选择中文简体)
(1)下载最新的汉化包,需要加上版本号
[root@10-27-0-224 ~]# git clone https://gitlab.com/xhang/gitlab.git -b v11.5.3-zh # -b指定下载分支
(2)停止GitLab服务
[root@10-27-0-224 ~]# gitlab-ctl stop
ok: down: alertmanager: 0s, normally up
ok: down: gitaly: 1s, normally up
ok: down: gitlab-monitor: 0s, normally up
ok: down: gitlab-workhorse: 0s, normally up
ok: down: logrotate: 1s, normally up
ok: down: nginx: 0s, normally up
ok: down: node-exporter: 1s, normally up
ok: down: postgres-exporter: 0s, normally up
ok: down: postgresql: 1s, normally up
ok: down: prometheus: 0s, normally up
ok: down: redis: 0s, normally up
ok: down: redis-exporter: 1s, normally up
ok: down: sidekiq: 0s, normally up
ok: down: unicorn: 0s, normally up
(3)将下载的文件夹内容复制到gitlab目录下
[root@10-27-0-224 ~]# cp -r -f  ./gitlab/*  /opt/gitlab/embedded/service/gitlab-rails/
cp: overwrite ‘/opt/gitlab/embedded/service/gitlab-rails/app/controllers/abuse_reports_controller.rb’? y
cp: overwrite ‘/opt/gitlab/embedded/service/gitlab-rails/app/controllers/admin/abuse_reports_controller.rb’? y

# 复制时可能不断提示是否要覆盖,这时可能是系统每次执行cp命令时,其实是执行了cp -i命令的别名。出现这种情况可以修改~/.bashrc,在“alias cp=’cp -i’”前加#注释,再刷新文件 source ~/.bashrc
[root@10-27-0-224 ~]# \cp -rf  ./gitlab/*  /opt/gitlab/embedded/service/gitlab-rails/     # 覆盖cp
(4)重新加载配置,并启动Gitlab
[root@10-27-0-224 ~]# gitlab-ctl reconfigure
[root@10-27-0-224 ~]# gitlab-ctl restart
ok: run: alertmanager: (pid 87258) 0s
ok: run: gitaly: (pid 87268) 0s
ok: run: gitlab-monitor: (pid 87282) 1s
ok: run: gitlab-workhorse: (pid 87295) 0s  # 轻量级的反向代理服务器
ok: run: logrotate: (pid 87306) 1s         # 日志文件管理工具
ok: run: nginx: (pid 87316) 0s             # 静态web服务器
ok: run: node-exporter: (pid 87324) 1s
ok: run: postgres-exporter: (pid 87330) 0s
ok: run: postgresql: (pid 87412) 0s
ok: run: prometheus: (pid 87420) 1s
ok: run: redis: (pid 87431) 0s
ok: run: redis-exporter: (pid 87437) 1s
ok: run: sidekiq: (pid 87443) 0s           # 用于在后台执行队列任务(异步执行)
ok: run: unicorn: (pid 87452) 1s           # An HTTP server for Rack applications,GitLab Rails应用是托管在这个服务器上面的
(5)再次WEB访问,已经完成汉化

2.5 GitLab常用命令
gitlab-ctl start          # 启动所有 gitlab 组件;
gitlab-ctl stop           # 停止所有 gitlab 组件;
gitlab-ctl restart        # 重启所有 gitlab 组件;
gitlab-ctl status         # 查看服务状态;
gitlab-ctl reconfigure    # 启动服务;

vim /etc/gitlab/gitlab.rb                         # 修改默认的配置文件;
gitlab-rake gitlab:check SANITIZE=true --trace    # 检查gitlab;

gitlab-ctl tail           # 查看日志;
三、GitLab使用配置
3.1 安装Git工具
[root@ansible ~]# yum install git -y
3.2 秘钥文件
(1)生成秘钥文件
[root@ansible ~]# ssh-keygen
Generating public/private rsa key pair.
Enter file in which to save the key (/root/.ssh/id_rsa):
Enter passphrase (empty for no passphrase):
Enter same passphrase again:
Your identification has been saved in /root/.ssh/id_rsa.
Your public key has been saved in /root/.ssh/id_rsa.pub.
The key fingerprint is:
SHA256:QbYXjzdAXwrdAZMnpHqRcUG3vsOrGgpKuF31Qk3O53k root@ansible
The key's randomart image is:
+---[RSA 2048]----+
|        o.*+B=+. |
|       o . %+=o. |
|        o B *o.  |
|         O o o   |
|        S = . .  |
|   .   o o o o . |
|  . . o . o o E  |
|   + o . o . . o |
|  . o   . .....  |
+----[SHA256]-----+
(2)查看秘钥
[root@ansible ~]# cat .ssh/id_rsa.pub
ssh-rsa AAAAB3NzaC1yc2EAAAADAQABAAABAQCYss+RVnIw226aTBvBlx/9J0693e1Bf6UkyK361vBrQ5rGhn5YjO7i7UuJKJFTS1Ei6aHAeShbvTqROrhmFz0xZF7FVpf4567/GrDdQlPsj6yluYbsqii6sEYrgw5oRF06S6FN/qJvX/qfDOymjJOQ7ER/LJwsOIRhdJnNXPYyFSg5BLywZ7/xc8OJ2drSiCN5ThgeNfh3ASUyRFdQXi7sjfBTu9auWBWyyq95TtR+wUc4EsoPBrBrZAHpzIsAoiQdk0obPaahJVQtm141/bd8Ip9dvBl5Nmqy1opHpR2p46hCWcPa0Lz2gJl/h4HUkzSLhMAk+VMIBQAe6PHNa/Tz root@ansible
3.3 配置GitLab项目

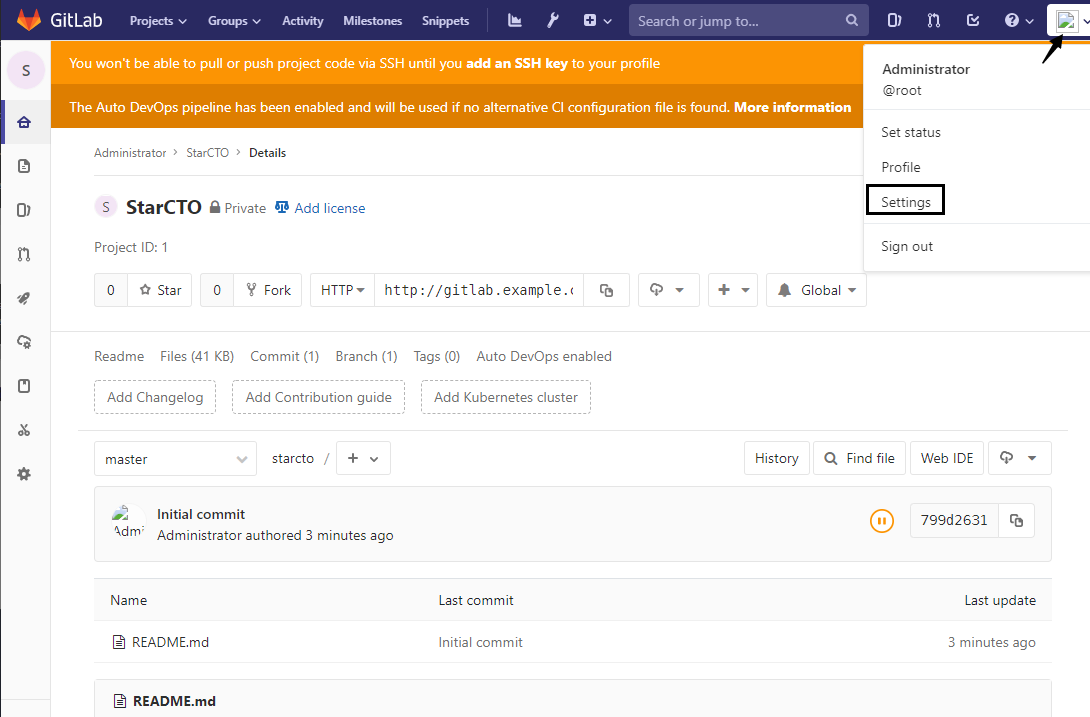

3.4 本地仓库配置
(1)配置使用Git仓库的人员姓名
[root@ansible ~]# git config --global user.name "starcto"
(2)配置使用Git仓库的人员email
[root@ansible ~]# git config --global user.email "1938418737@qq.com"
(3)克隆项目
在本地生成同名目录,并且目录中会有所有的项目文件.
[root@ansible mnt]# git clone git@gitlab.starcto.com:root/starcto.git
Cloning into 'starcto'...
The authenticity of host 'gitlab.starcto.com (113.31.154.220)' can't be established.
ECDSA key fingerprint is SHA256:YRAbXf1JrrGhh/n4aQG9oddXKpIph0q0onn97sjGF94.
ECDSA key fingerprint is MD5:e6:69:de:d4:47:a3:99:38:6b:4b:13:da:b1:3e:09:33.
Are you sure you want to continue connecting (yes/no)? yes
Warning: Permanently added 'gitlab.starcto.com,113.31.154.220' (ECDSA) to the list of known hosts.
remote: Enumerating objects: 3, done.
remote: Counting objects: 100% (3/3), done.
remote: Total 3 (delta 0), reused 0 (delta 0)
Receiving objects: 100% (3/3), done.
3.5 推送代码到GitLab仓库
(1)本地仓库中编写代码或拷贝代码到本地仓库
[root@ansible mnt]# cd starcto/
[root@ansible starcto]# tree
.
└── README.md

0 directories, 1 file

[root@ansible starcto]# vim backup.sh
(2)查看文件状态— 没有被git管理的文件
[root@ansible starcto]# git status

(3)文件添加到暂存区状态
[root@ansible starcto]# git add backup.sh
[root@ansible starcto]# git status

(4)代码文件提交到git
[root@ansible starcto]# git commit -m"add a backup.sh"
[master 770dfee] add a backup.sh
 1 file changed, 1 insertion(+)
 create mode 100644 backup.sh
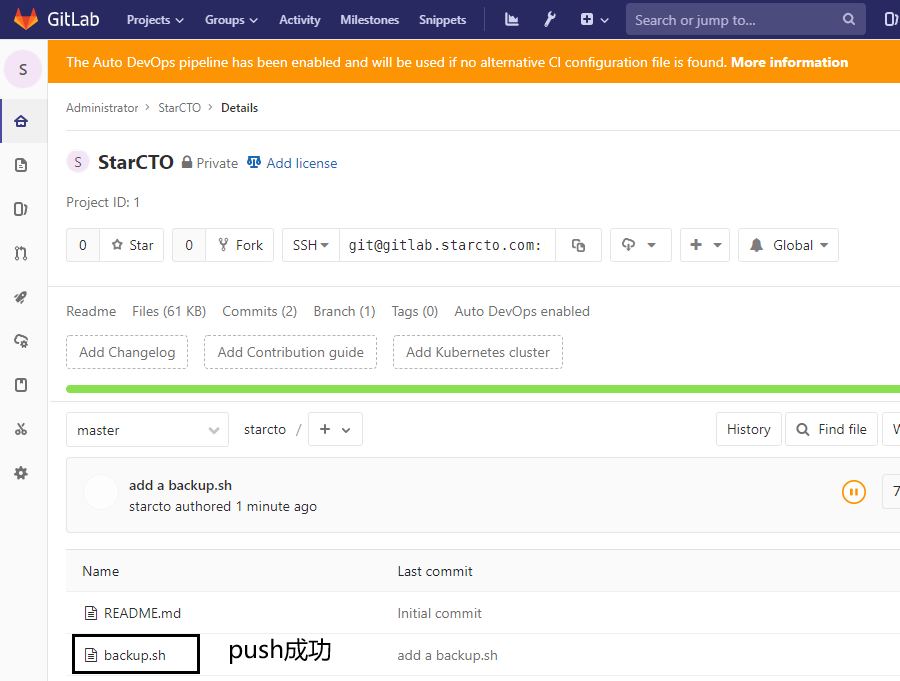
(5)提交代码到远端GitLab代码托管平台
[root@ansible starcto]# git push
Enumerating objects: 4, done.
Counting objects: 100% (4/4), done.
Compressing objects: 100% (2/2), done.
Writing objects: 100% (3/3), 277 bytes | 277.00 KiB/s, done.
Total 3 (delta 0), reused 0 (delta 0)
To gitlab.starcto.com:root/starcto.git
   799d263..770dfee  master -> master
作者:UStarGao
链接:https://www.starcto.com/devops/189.html
来源:STARCTO
著作权归作者所有。商业转载请联系作者获得授权,非商业转载请注明出处。
UCloud云平台推荐
随便看看
- 2021-05-15UDB MySQL主从复制延时的原因和解决方案
- 2021-07-21MySQL主从同步异常之从库误写数据
- 2021-07-21MySQL主从同步异常之Relay log异常1594
- 2021-09-14Docker部署RabbitMQ集群并实现Haproxy代理
- 2022-05-08Prometheus+Grafana监控Docker容器


